
Quick start, from sign up to first send
Set up Tantra, connect the accounts you need, load contacts, and launch your first calendar or multichannel outreach campaign.
Open in Tantra
These open the app in a new tab. You may be asked to sign in.
Overview
This guide takes you from a new account to your first send. It links out to the detailed setup articles at each step, so you can go deep where you need to and move quickly where you do not.
The basic path is the same for every campaign: sign up, connect the accounts your channels need, load contacts, then build and launch.
Before you start
You need:
- A Google Workspace account with admin access to your domain.
- Permission to create a service account and grant it access in your Google admin console.
- A list of contacts to reach, ready as a CSV file.
If you want AI-written messages, you also need an API key from a supported AI provider. This is optional. Template copy works without it.
Step-by-step
1. Sign up
Go to the sign-up page and create your account using the options shown on the form.
You can return later through the sign-in page at any time.
2. Connect Google Workspace
Nothing sends until Tantra can send as your mailboxes. Open Connectors and set up your Google service account with domain-wide delegation. This is the one step that needs a Google admin.
Follow these in order:
- Create a Google service account.
- Grant domain-wide delegation and scopes.
- Upload your service account to Tantra.
If you want the full picture first, read How Tantra sends as your mailboxes.
3. Verify your senders
Open Accounts and add the mailboxes you plan to send from. Tantra probes each one against your service account and marks it connected when impersonation succeeds. See Add and verify your senders.
A mailbox that will not connect usually needs its Google Workspace permissions checked. See Sender connection states explained.
If your sequence will use LinkedIn, WhatsApp, or Telegram, activate the matching channel on Billing under Add-ons, then connect the account under Connectors. See Activate and manage channel add-ons.
4. Load your contacts
Open Contacts and import your list from CSV. You can organize contacts into lists to target specific campaigns. See Import contacts from CSV.
5. Create your first campaign
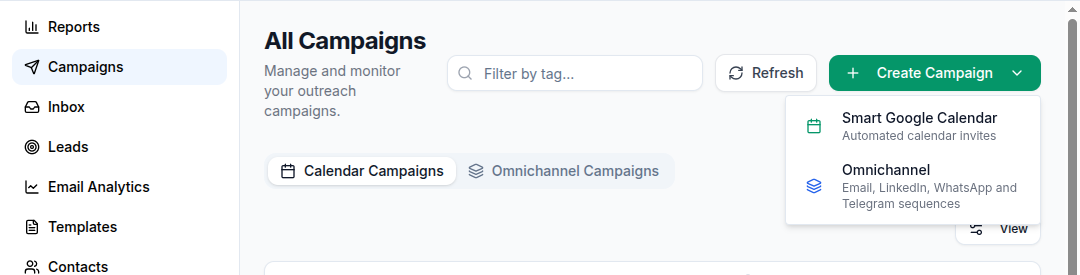
Open Campaigns and choose Create Campaign. Pick the engine that fits your goal:
- Smart Google Calendar creates a calendar invitation campaign. See Create a smart calendar campaign.
- Omnichannel creates a multi-step sequence using email alone or a mix of email, LinkedIn, WhatsApp, and Telegram. See Build an email sequence or Build a multichannel outreach sequence.
If you are not sure which to use, read Calendar campaigns vs cold email.
6. Launch and watch
Start the campaign from its row on the Campaigns page. Both engines work asynchronously, so sending happens in the background rather than all at once.
What happens next
Sending does not all fire the instant you launch. Here is what to expect and where to watch:
- Calendar campaigns create events, then add attendees in batches so Google does not throttle you. Invitations go out as attendees are added. Watch progress and RSVPs under Reports.
- Outreach sequences enroll contacts, then run each channel step within the campaign's timing and account limits. Watch conversations in the Inbox and email performance under Email Analytics.
Give each engine a few minutes to begin working after you launch. Progress updates as batches and steps run.
Best practices
- Complete Google Workspace setup before anything else. Every later step depends on it.
- Test with a small list first to confirm senders, copy, and personalization behave as expected.
- Connect your own AI provider only if you want personalized messages. Templates work on their own.
Common mistakes
- Trying to launch before any sender is verified. Connect Google Workspace and verify senders first.
- Uploading contacts with a broken CSV. Check the import guide for the expected format.
- Expecting the whole list to send instantly. Both engines pace sending in the background.
Troubleshooting
| Symptom | Cause | Fix |
|---|---|---|
| No campaign will start | No verified sender yet | Verify a mailbox on Accounts. See Add and verify your senders |
| A calendar campaign is not sending invites | Setup or scheduling issue | See My calendar campaign is not sending invites |
| Emails are not going out | Sender, window, or limit issue | See My emails are not sending |
| A sender shows disconnected | Delegation or scope problem | See A sender shows as disconnected |
FAQ
How long does setup take?
Most of the time goes into Google Workspace setup, which needs an admin. Once senders are verified, building a campaign takes a few minutes.
Do I need a paid plan to start?
You can sign up and set up the product on the free plan. See Plans, pricing, and managing your subscription.
Where do I manage my own account details?
Open the account menu after signing in to manage your profile and account details.
Can I skip AI personalization?
Yes. Personalization is optional. Template copy sends without any AI provider connected.
Which engine should I start with?
Start with the one that matches your goal. Calendar campaigns for events and invitations, cold email for multi-touch prospecting. See Calendar campaigns vs cold email.
Related articles
Was this article helpful?
Related articles
- How Tantra sends as your mailboxesTantra sends from your own Google Workspace mailboxes using a service account and domain-wide delegation, without ever holding your passwords.
- Create a smart calendar campaignCreate a Google Calendar invitation campaign in Tantra with the five step wizard. Set the audience, senders, event details, and launch.
- Build an email sequenceUse Tantra's six-step wizard to build a cold email sequence, pick senders and audience, set limits, and launch or schedule your campaign.
- Build a multichannel outreach sequenceCombine email, LinkedIn, WhatsApp, and Telegram steps in one Tantra outreach sequence.
- Manage your account and sign-inOpen your account profile, update your details and security settings, and sign in or out of Tantra.